


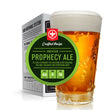


2 Gal. Premium Beer Brewing Kit
SKU # 80100
Regular price $110.00 Available
Unit price per
Vendor: BrewDemon
An excellent starter kit - for those who like to keep things simple. If you can work a spoon you can make this beer. We know you would love this kit, but you might also know someone who would love it even more?
Share:
THIS KIT INCLUDES YOUR FIRST 2 GALLON RECIPE.
2 GAL. PREMIUM CRAFT BEER BREWING KIT
The ‘Craft Beer Revolution’ beat goes on as more and more Americans realize that Big Beer all tastes the same. You keep hearing that Craft Beer has flavor and you want to find out! Well, now’s the time, with your own Craft Beer Kit.
This kit includes one of our most popular Craft Series recipes, it's light in body and color but rich in flavor with an ABV rating of around 4.6%. You’ll enjoy every gulp. Beer is not for sitting and sipping. That’s tea. (A different Revolution.)
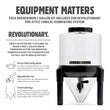
Speaking of Revolution, that describes the world’s first (patented) small batch conical fermenter which is included with this kit. It allows you to brew batch after batch and always with great results. It’s designed that way. The only thing this kit is missing are the bottles, but there are many ways to get these. You can buy them, save them, or collect them, it doesn’t matter. If they previously held carbonated beverages, they will work with this kit (more about this in the instructions).
Once your friends taste your beer, they’ll want a Craft Beer Kit too, so help out by taking names! This Craft Beer Kit makes a great gift! (Or just send your friends to us!)
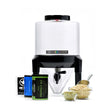
Kit Includes
- (1) Conical Fermenter
- (1) Fermenter Base
- (1) Adjustable Flow Tap Assembly
- (1) Venting Plug
- (1) Stick-on Temperature Gauge
- (1) Recipe Ingredients
- (1) Packet of Dry Brewing Yeast
- (1) Packet of One Step No-Rinse Cleanser
- (1) Easy to Follow Brewing Instructions.
Optional
- (1) Force CO2 Syetem (Carbonbate your beverage in just one day!)
- (1) Bottles, Caps and Labels
ABV
4.6
% ALCOHOLSRM
9
BITTERNESSIBU
18
COLORBrewers Note:
This kit does not include bottles. Make sure to sanitize anything that comes in contact with your beer. Also, the fermenter can be upgraded with an airlock, but requires a lid gasket to create the airtight seal.
2 GALLON BREWING INSTRUCTIONS
This is the most important step in the brewing process. It kills any bacteria, wild yeast and mold that can cause off-flavors in your beer. It’s important to sanitize everything that comes in contact with your beer. This step should take about 15 minutes.
- 1.1. In a container, dissolve half (1 tbsp) of the One Step No-Rinse Cleanser into a gallon of warm water. Shake until the cleanser has completely dissolved. Note: Save the remaining One Step for bottling.
- 1.2. Pour solution into the fermenter, screw on the lid and place your venting plug into its hole. Cover venting plug and swirl the solution around making sure it contacts the entire inside surface including the lid. Do this step over the sink
- 1.3. Open and close the tap several times to sanitize the inner surface.
- 1.4. Place your mixing spoon(s), measuring cup and can opener* inside the fermenter. Careful not to scratch the inside surface. Allow it to soak a minimum of 10 minutes.
- 1.5. Remove utensils and place them on a clean paper towel or a sanitized plate or bowl. Drain fermenter (no rinsing required). Note: Solution is reusable, you can use it again to sanitize a blender or any other utensil used during the brewing process.
The included recipe is ready for fermentation, just add water and yeast (under the black lid of the extract). Since beer is mostly water, the better the water the better your beer. This step should take about 30 minutes.
- 2.1. Fill your fermenter with a gallon of cold water. For best results, use bottled spring water or charcoal-filtered tap water.
- 2.2. Remove yeast packet(s) from under the lid of your beer mix and stand both cans in a tub of hot tap water. This will help them pour more easily.
- 2.3. Place 4 cups of water into a clean 3-quart pot and bring to a boil.
- 2.4. Remove from heat. Then slowly stir in the contents from both cans until they have fully dissolved. This mixture is called the wort.
- 2.5. Pour the wort into the fermenter. Bring the volume of the fermenter up to the 8.5-quart mark by adding more water. Mix thoroughly. Read the thermometer and wait until the temperature of the wort is between 64°- 82° F before adding the yeast.
- 2.6. Add the yeast. Then attach your lid. (If using an airlock attach it now).
- 2.7. Place the fermenter out of direct sunlight and maintain a temperature between 64°- 82° F for approximately 7-14 days.
After 7 days the beer in your fermenter should have stopped fermenting and begun to clear. It's now time to bottle! If you're not sure, draw a small amount from the tap; if it tastes like flat beer, it's ready to bottle. If it tastes sweet, give it a few more days
Since nobody likes flat beer we need to add carbonation. It is normal for this process to create a small amount of yeast sediment at the bottom of each bottle. This step should take about 45 minutes.
- 3.1. Dissolve the remaining One Step into a gallon of warm water.
- 3.2. Fill each bottle half full with solution, place caps on (just a few turns) and shake a few times. Allow them to sit for a minimum of 10 minutes.
- 3.3. Remove caps and empty bottles. No rinsing is required.
- 3.4. Add 2-1/2 teaspoons of white granulated sugar to each bottle. If you’re using bottles other than what came with the kit, see the priming sugar chart above for the correct sugar amount.
- 3.5. Using the tap, fill each bottle halfway up the base of the neck. Make sure all bottles contain approximately the same amount of beer. Remove venting plug or airlock (if used) for this step.
- 3.6. Cap each bottle and invert them several times until the sugar has been completely dissolved. Do not shake bottles.
- 3.7. Place the bottles upright, out of direct sunlight and maintain a temperature between 64°- 82° F for approximately 7 days.
After your beer has carbonated, it’s ready to drink! However, you can improve the flavor by bottle conditioning your beer. This can be done a couple ways:
- Warm conditioning: Keep your bottles in a dark, dry location away from sunlight and maintain a temperature between 50°- 70° F for several weeks to a month.
- Cold conditioning: Place your bottles in the refrigerator for several weeks to a month.
ABV
4.6
% ALCOHOLSRM
9
BITTERNESSIBU
18
COLORBrewers Note:
This kit does not include bottles. Make sure to sanitize anything that comes in contact with your beer. Also, the fermenter can be upgraded with an airlock, but requires a lid gasket to create the airtight seal.